
Let Me Tell You Why You Should Use 3 Point Lighting When Videotaping
Affiliate Disclosure: In full transparency ? some of the links on this website are affiliate links, if you use them to make a purchase we will earn a commission at no additional cost for you (none whatsoever!). Will this be a problem? This is how we manage to create free content for you. Please know that your trust is so important for us. If we recommend anything, it is always because we believe it is worth exploring.
Sometimes in life, we allow technical things to stop us in our tracks from pursuing a dream. We know that the "thing" we want to achieve requires study, research, and technical knowledge. We become intimidated at the mere thought of doing something "technical." Today let's talk about lighting. Just in case you did not know, the correct lighting when videotaping/filming or going LIVE on social media can make or break the appeal to potential clients or followers who decide to hit that subscribe button or switch to another channel. Don't fret because 3 Point Lighting is your friend! Now, it is time to discuss 3 Point Lighting and why it is necessary to use it when recording.
First, Let's Go Over the Basics:
What is 3 Point Lighting?
3-point lighting is a standard method used in visual media such as theatre, video, film, still photography, and computer-generated imagery.
By using three different positions when lighting a subject or person, the photographer or videographer can illuminate the shot's subject matter while also controlling (or eliminating) the shading and shadows produced by direct lighting. Try using 3 Point lighting in all of your filming or photographs to enhance the mood of the subject matter.
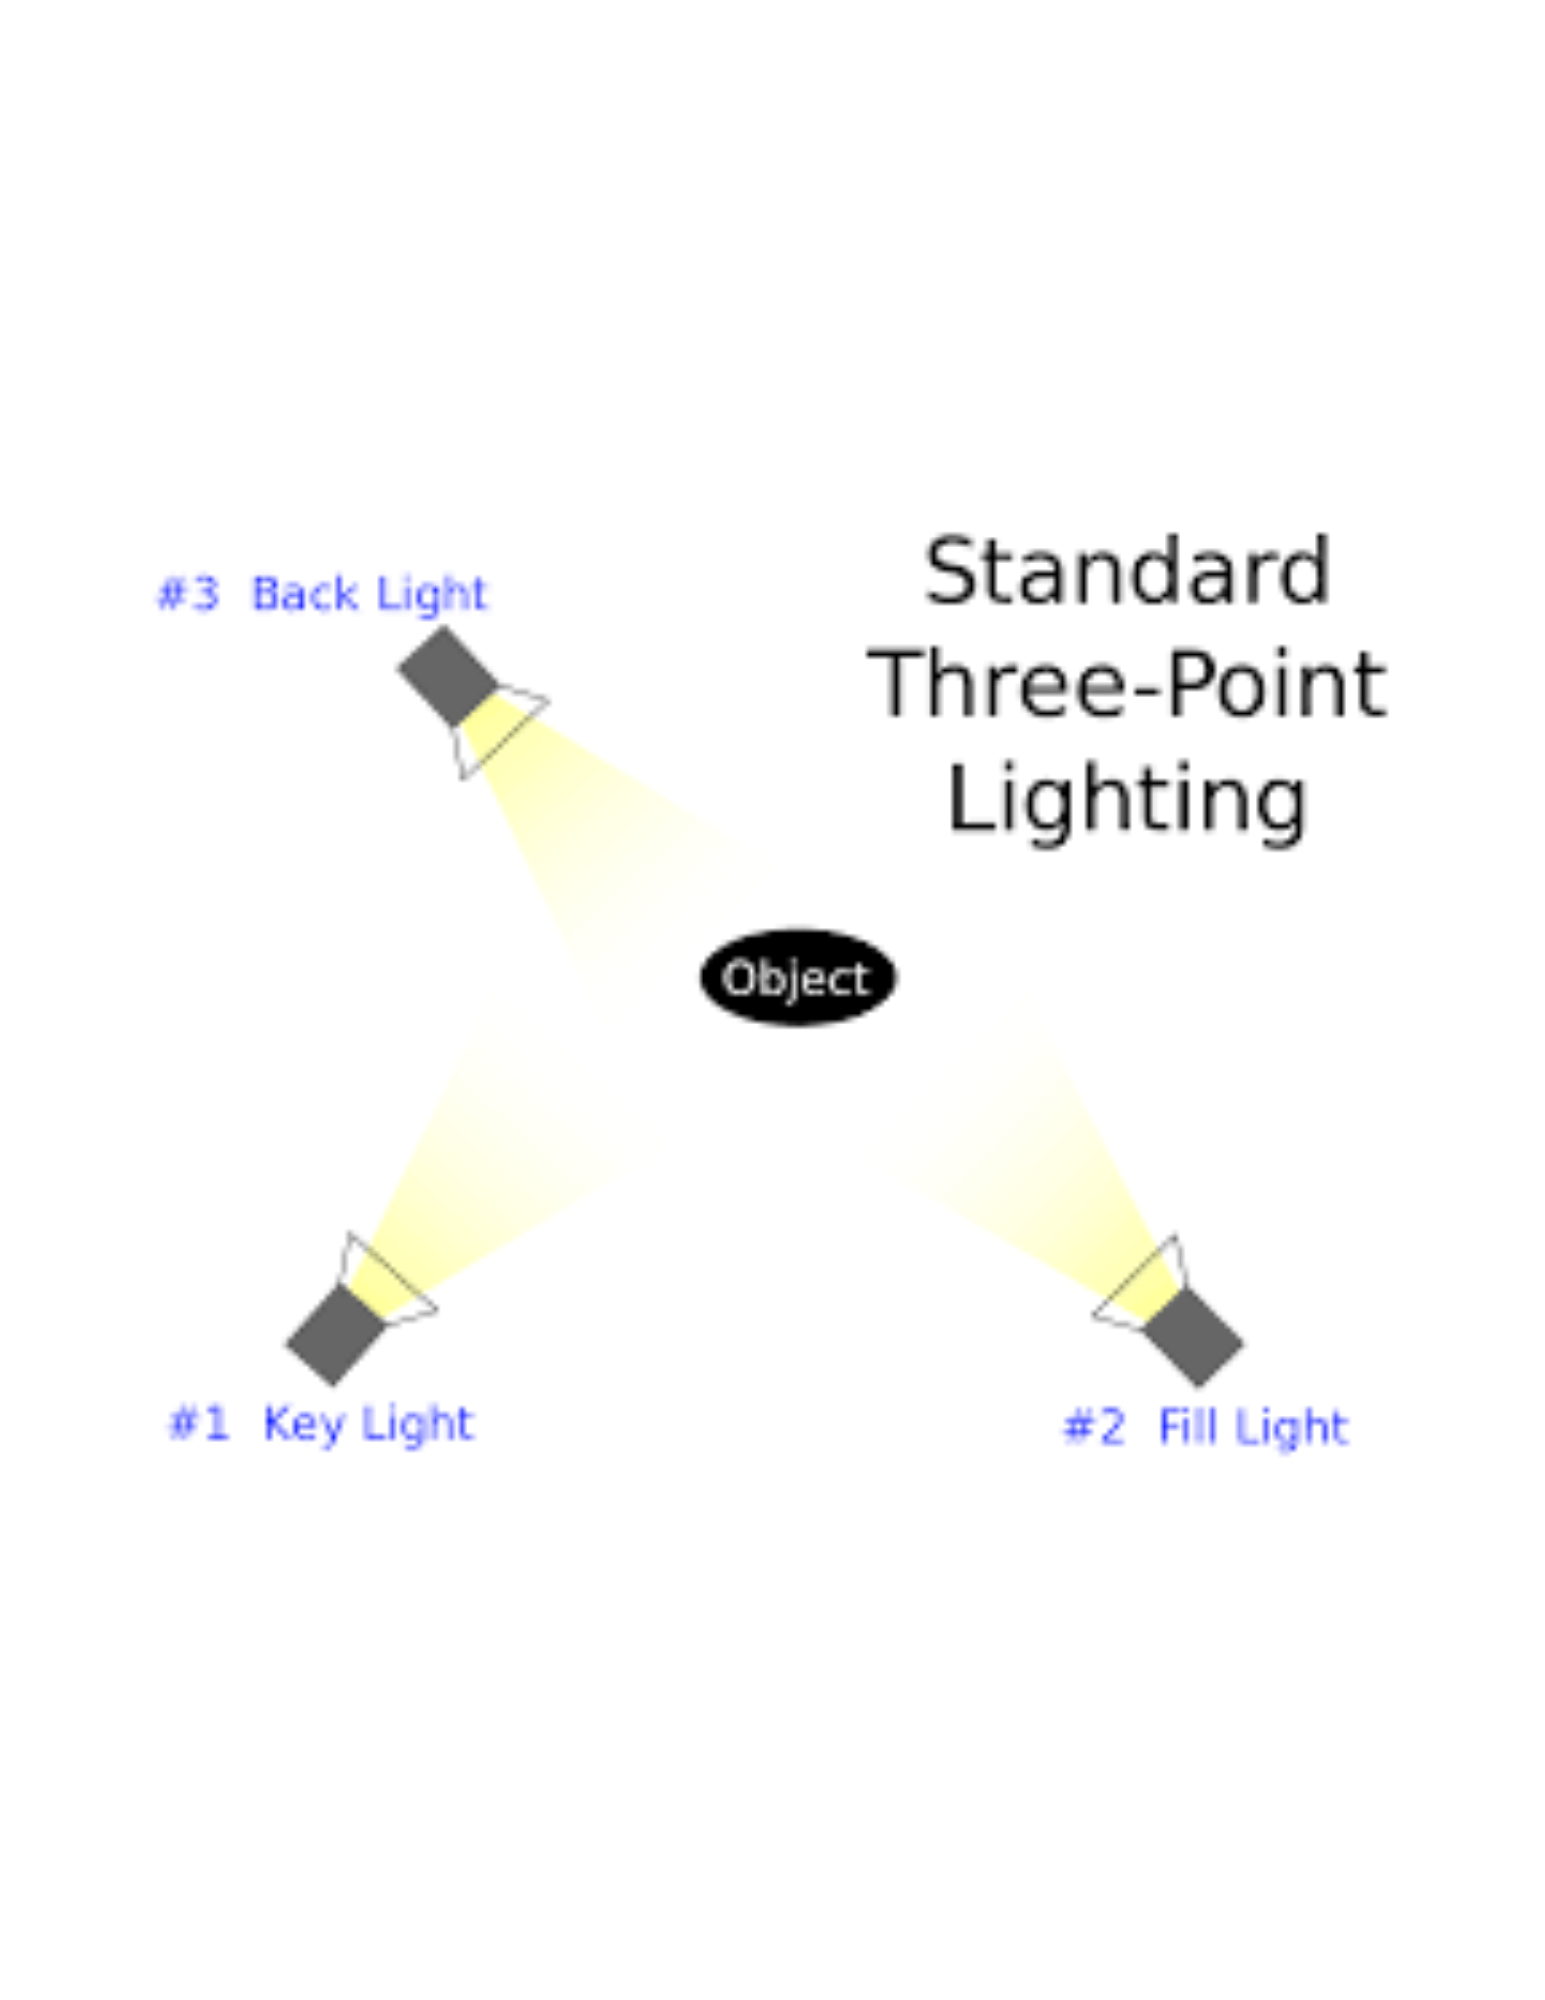
The Key Light
The Key light shines directly upon the subject and serves as its primary source of illumination. The strength, color, and angle of the Key light determine the shot's overall lighting design. In indoor shots, the key light source is from the camera's built-in light.
The Fill Light
The fill light shines on the subject from a side angle. The fill light is often set at a lower position than the key light (about at the level of the subject's face). The fill light balances the Key light by illuminating shaded surfaces and lessening or eliminating contrasts, such as the shadow cast by a person's nose upon the rest of the face. It is usually softer and less bright than the key light. If you do not use a fill light, it can result in sharp contrasts across the subject's silhouette due to shadows. Sometimes, as in low-key lighting, this is a deliberate effect. Shots intended to look more natural and less stylistic require a fill light.
In some instances, a photographer/videographer can use a reflector (such as a piece of white cardstock mounted or even a white-painted wall) as a fill light instead of an actual lamp. You can also purchase lights with a white or silver umbrella attached that act as a reflector. Reflecting and redirecting the Key light's rays back upon the subject from a different angle can cause a softer, subtler effect than using another lamp.
The Backlight
The backlight is needed to shine on the subject from behind them. Backlighting acts as an illusion to separate the object or person from the background and gives the audience a sense of highlighted contours illuminating from the subject's backdrop. You may witness this a lot when people use a "green screen" when recording on platforms such as Zoom, Loom, or Streamyard, or "chroma-key" in studio settings. Backlighting makes a big difference in the "look" of dimension in a videotaped or photography session.
The Benefits Of Applying What Is Learned
I like to use the illustration below to give you a visual view of 3-point lighting. I have a deeper understanding of how things work together when I read the directions and look at a diagram when assembling an item. The picture below helped me when I first learned about 3 Point lighting. My mind illuminated when it was my time to practice creating 3-point lighting in a studio practice session. If you grasp technical techniques easier by first reading about the process and then practice by watching someone else complete the task, then the 3-point lighting concept should be easy for you to follow.
Summary
I do believe in practicing every technical tip to see if it lines up with what you learned. Now it is time for you to test it out for yourself. If you have a laptop or desktop, you can use the camera light as your KEY LIGHT and use two additional lights positioned to the right and left of the taped subject as your FILL LIGHT and BACKLIGHT.
If you are a novice and don't want to invest a lot of money, I recommend the ring light. It is inexpensive, allows you to change the color hue to cool white, warm yellow, or daylight. The intensity of the light is adjustable. It uses an a/c adapter and stands on a tripod which is lightweight and portable. Various websites and retail stores offer the ring light at a reasonable price. Once you gain more experience and would like to upgrade your equipment to a more "industry standard" level, look into purchasing higher-priced professional studio lighting kits. The price may range from less than $100 to upwards of a few hundred dollars. Depending on the brand and type of light, the cost will rise. Some lights will produce low heat while giving off an enormous amount of bright white light while others may generate a lot of heat and generate an abundance of light. You may want to also invest in purchasing weights to place at the bottom of the lighting tripod stand. If you are on a remote location shoot, adding weights to the bottom of the tripod will secure the light by preventing accidental toppling over of the lamp due to wind shift or someone accidentally bumping the light or tripod. I've made that costly mistake in the past, just giving you a warning :-)
Did you find This Blog Post Helpful?
If it piqued your interest, let me know in the comments below!
Feel free to share this post with your loved ones.
Don't Sit On The Sidelines,
"Let's Take It Up A Notch"
Denise Sutton
Video Presence Consultant
FREE 5 DAY CHALLENGE: "Video Presence Made Easy"
Email: denise.denisesuttonconsultant.com
Twitter: DeniseSuttonConsultant (@DeniseSuttonCo1) / Twitter
Facebook: Denise Sutton Consultant | Facebook
Instagram: Denise Sutton (@denisesuttonconsultant)